Are you considering a new asphalt driveway for your home?
Installing an asphalt driveway can enhance the appearance of your home and potentially raise its value.
Not only is asphalt a durable and cost-effective option compared to concrete, but it’s also easier to install. In this article, we’ll walk you through the process of installing an asphalt driveway
What Is an Asphalt Driveway?
Asphalt driveways are used outdoors. Its asphalt and crushed stone layers are sealed to protect the underlying materials from water, UV exposure, and other elements. Asphalt is stronger and easier to install than concrete.
What Are Asphalt Driveway Benefits?
Asphalt driveways have many advantages:
1. Durability—Asphalt can withstand heavy wear and tear, making it ideal for driveways. It outlasts concrete and gravel.
2. Cost-Effectiveness—Asphalt is cheaper than concrete and easy to install. Resurfacing may not be needed for long periods.
3. Low Maintenance – Busy homeowners who don’t have time to maintain their driveways can choose asphalt. The material resists oil and gasoline spills, reducing the need for cleaning and repairs.
4. Aesthetics—Asphalt can be colored, patterned, and textured to create a unique look. It appeals to homeowners looking to improve curb appeal.
When is the Optimal Time to Replace an Asphalt Driveway with a Brand New One?
The best time to install a new asphalt driveway is during the late spring or early summer when temperatures are moderate and the ground has had time to thaw. It’s also important to consider regional climate patterns as well.
For example, if you live in a region with very cold winters, it may be best to wait until later in the summer to start your asphalt driveway project.
This will allow for enough time for the soil to thaw and the material to adequately settle before colder weather arrives. It’s also important to consider any potential rain or snow that may occur throughout the season, as this can affect installation and curing times. Ultimately, it’s best to
Why Warm Weather is Better for Asphalt Driveway Installation
The optimal time to install an asphalt driveway is when temperatures are between 50–90° F (10–32° C). Warmer temperatures allow the asphalt to be applied and compacted, leading to a better-finished product.
If you attempt to install your driveway in cold climates, the process will take longer, and the asphalt will not be able to properly adhere to the base. Additionally, colder temperatures can lead to poor bonding, cracking, crumbling, and other damages that can reduce the overall lifespan of your driveway.
For these reasons, we recommend beginning your project no earlier than May in most regions of North America. This allows for plenty of time for the asphalt to settle and harden before winter weather arrives.
For best results, always check the temperature forecast before beginning your project so you can plan accordingly. Also, be prepared to work quickly if temperatures are expected to drop during your installation process. This will help ensure that the asphalt is laid correctly.
7 Steps to a Successful Asphalt Installation: From Demolition to Butt Joint Installation
Asphalt installation is a complex process that involves several steps, from demolition and removal to proper grading and sloping, laying and compacting the sub-base, and finally achieving a smooth and durable surface with the right binder layer and butt joint installation. Each step of the process requires expertise, precision, and attention to detail to ensure the longevity, stability, and aesthetic appeal of the pavement.
In the next section, we will explore each step of the asphalt installation process in detail and discuss how Nathan’s Paving, a sustainable and experienced contractor, employs modern technology and eco-friendly practices to deliver a beautiful and long-lasting asphalt surface.
1: Initial step is to demolish and remove.
Asphalt installation requires demolition and removal. Nathan’s Paving uses bobcats, forklifts, front loaders, and large dump trucks to efficiently complete this step. These machines quickly remove asphalt, concrete, and pavers and dispose of debris.
Nathan’s Paving provides fast, eco-friendly demolition. We recycle nearly 100% of job site waste to make strong, usable asphalt. Nathan’s Paving is a sustainable, experienced contractor.
2: Ensuring Proper Drainage and Preventing Water Damage with Expert Grading and Sloping Techniques for Asphalt Pavement
Grading and sloping asphalt ensure water drainage. Nathan’s Paving’s asphalt experts use modern technology to level and slope the surface. Laser-guided transits and motor graders do this. Nathan’s Paving reduces water damage like potholes and cracks by applying the right slope to pavements.
Without proper sloping, stagnant water accumulates on the surface, making it more vulnerable to frost or pressure from traffic or heavy objects. Properly graded and sloped surfaces prevent standing water from seeping into the paver material and causing cracks. Nathan’s Paving’s experts inspect each project before work begins to ensure long-lasting pavement.
3: The Key Role of a Properly Laid and Compacted Sub Base in Ensuring the Durability and Stability of Asphalt Pavement
A successful asphalt pavement depends on its sub-base. For stability and durability, subbases are laid before asphalt. It prevents winter damage by blocking frost.
Subbase thickness and stability are important. This ensures optimal compaction, which protects the asphalt overlay above it for years. A well-compacted and laid sub-base is necessary for asphalt to retain its appearance and function. Failure to compact the sub-base may require costly repairs or even repaving.
4: Proof rolling and undercutting are two types of repairs that are done to the sub-base.
Asphalt paving begins with a proof roll. Nathan’s Paving drives a quad-axle dump truck loaded with 72,000 pounds row by row over the entire sub-base during preparation. It tests ground support for new asphalt. If it bends more than one inch under the heavy truck, your sub-base may have weak spots that could affect your pavement.
Before laying asphalt, soft spots found during proof rolling must be repaired. Undercutting works well in this case.
Digging several feet below the surface and replacing soft soil or clay with stronger aggregate material improves support. After repairs, the compacted substrate will last longer and produce a smoother product.
Nathan’s Paving guarantees a beautiful, durable product after Undercutting Sub Base Repair and Proof Roll!
Step 5: Achieving a Strong and Durable Asphalt Surface with the Right Binder Layer
Binder layers determine asphalt surfaces. Oil-bound large aggregate makes it strong and durable.
This layer prevents layers from shifting or warping under pressure or weather conditions. Binders protect asphalt from wear and tear.
Quality binder requires proper mixing and volume and thickness standards. Too much can weaken the subbase layer and prevent load bearing, while too little won’t provide stability or protect against water infiltration. Soft areas should be supported when adding the binder to ensure stability.
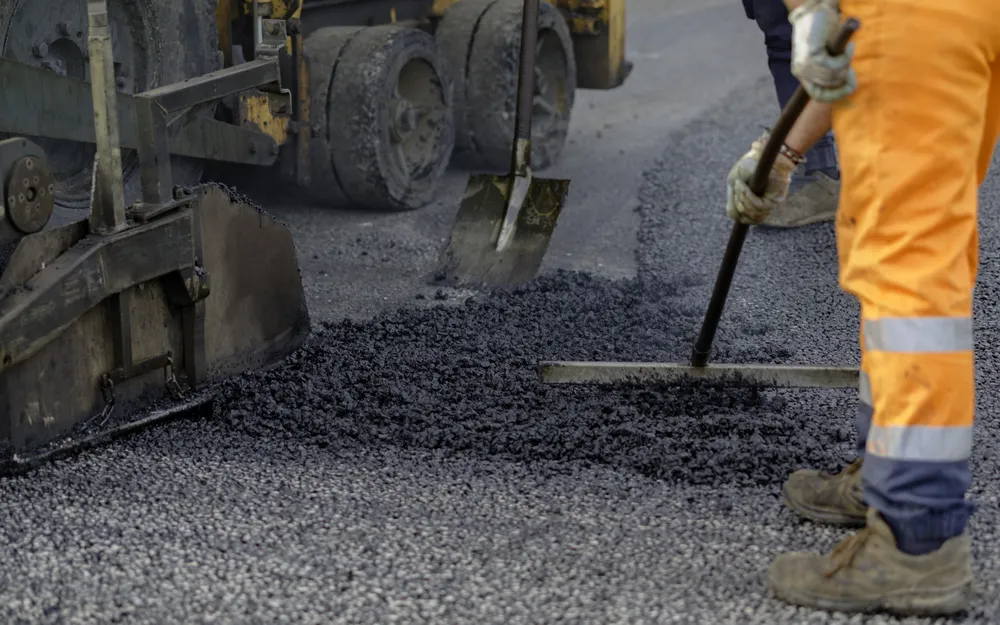
Step 6: Achieving a Smooth and Attractive Asphalt Surface through Proper Installation and Compaction
Users benefit from installing new asphalt. When applied properly, asphalt, a mixture of small aggregate, sand, and oil, creates a jet-black, attractive surface. Drivers enjoy a smooth ride on fresh asphalt because it provides an even surface for vehicle wheels to run over without the risk of dips or holes. Asphalt’s stability and strength protect surfaces from solar radiation and rainwater runoff.
Topcoat asphalt is laid before heavy machinery rolls and compacts the surface and fills any voids. Rolling and compaction seal each asphalt layer to the base material, creating a sealed unit beneath the driver’s wheels. Professional installation prevents problems like excessive water accumulation beneath and drainage issues, allowing asphalt pavement to last for years without repairs or other costly maintenance, making it one of the most cost-effective roadway investments.
7: Creating Seamless and Durable Butt Joints and Transitions in Asphalt Pavement
Butt joints make asphalt resurfacing look good and last. Without proper butt joint maintenance, water run-off could pool or flood the newly resurfaced pavement. Contractors ensure pavement levels are even and level by creating a butt joint between the old and new asphalt surface.
Butt joints start with careful leveling and grading of both surfaces. This will give both sections equal thickness and a smooth transition if done correctly. After grading, contractors will apply a tack coat and hot mix asphalt along each side of the joint to create a seamless connection. Each butt joint installation should be carefully compacted for best results.
The final step to finishing the project is to compile the final roll.
Asphalt paving installation completes the asphalt surface. This final rolling smooths the pavement after all the hard work and materials. The roller truck presses down on freshly laid asphalt to ensure seamless joins. This compacts the material to prevent small bumps or stones from popping through, which could later cause durability and function issues.
Before rolling, an experienced contractor should survey the area and provide an accurate estimate. The contractor will install any unique treatments and follow local regulations. With proper planning and oversight, your new asphalt surface should last many years and provide safety for daily traffic or light pedestrian use around your home or business.
Maintenance and Sealcoating
Once your new asphalt driveway is installed, it’s important to take proper care of it in order to ensure its longevity. The best way to do this is with regular maintenance and seal coating. Just keep in mind that fresh asphalt needs time to cure first, so learn when to seal a new asphalt driveway before booking that first seal coat.
Maintenance involves cleaning the surface of the driveway on a regular basis and spot-treating any cracks or holes that may form over time due to traffic or weathering. Cleaning should be done with a mild detergent or soap and water.
5 Quick Asphalt Maintenance Tips
Asphalt maintenance doesn’t need to be a huge undertaking. Here are 3 quick tips to help you keep your asphalt driveway in great shape:
1. Inspect regularly for any signs of damage such as cracks, holes, and ruts, and repair them with patching materials or other asphalt mixes when necessary.
2. Sweep away the debris that can accumulate on the surface regularly.
3. Clean the asphalt surface regularly with a pressure washer to remove dirt, debris, and other contaminants. This will help keep your asphalt looking its best.
4. Applying a seal coat every two to three years will protect the surface from water damage, oxidation, and UV rays. This should be done by an experienced professional for optimal results.
5. Finally, make sure you are using the right products and materials when it comes to asphalt repair. Using high-quality products will ensure that your driveway repairs last longer.
Follow these tips for a beautiful, long-lasting asphalt driveway!
Conclusion
For homeowners who want a durable, cost-effective, and low-maintenance driveway, an asphalt driveway is a good investment. Installing an asphalt driveway requires careful planning, execution, and upkeep.
Homeowners can get a long-lasting, smooth asphalt surface from Nathan’s Paving. To preserve its appearance and value, inspect and maintain your asphalt driveway regularly.
If you’re looking for more information on how to prepare your site for asphalt paving, understand the curing time process, and choose the best surface treatments for your project, then be sure to read our other blog posts for more detailed insight.