
As a homeowner, you may be considering installing a brand-new asphalt driveway as a dependable and affordable paving option. However, even the best-laid driveways can experience major issues over time.
In this blog post, we’ll discuss seven common asphalt paving issues that can occur in new asphalt residential driveways and tips on how to address them, so your driveway will be in excellent condition for years to come.
Problem #1: Alligator Cracks
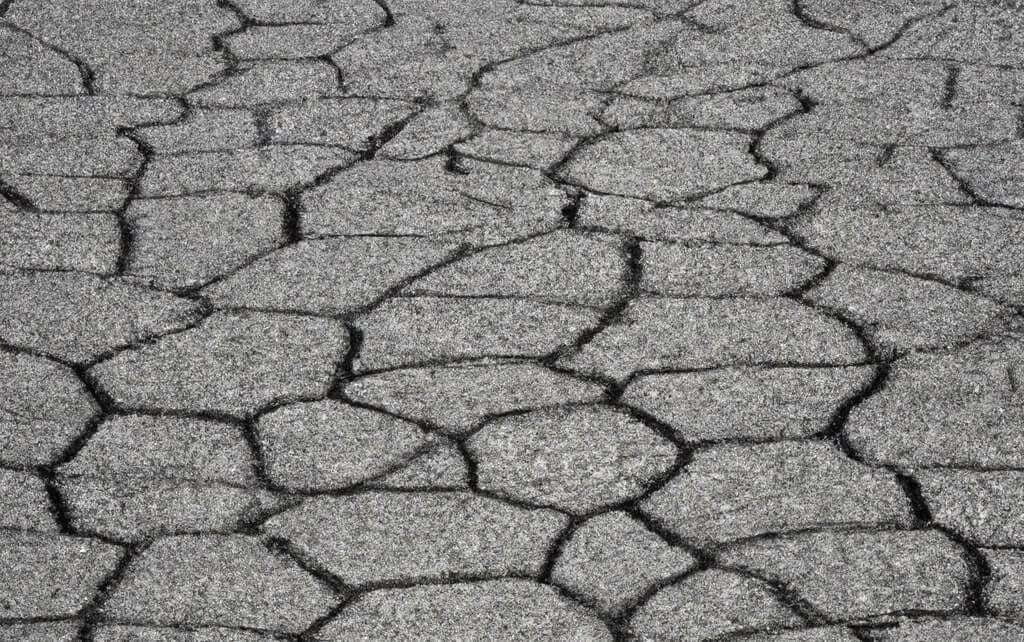
Cracks are caused by harsh weather conditions or heavy traffic driving off the side of the asphalt pavement causing edge crackings.
To prevent Alligator cracking, ensure proper compaction during installation and maintain a consistent thickness throughout. If cracks do appear, fill them promptly to avoid further damage.
How to fix a cracking driveway
Fill any existing cracks with a crack sealer and use an asphalt patch or a cold mix asphalt to fill larger areas of damage.
Problem #2: Potholes

Potholes form when standing water seeps into small pavement cracks and the expansion of water during freeze-thaw cycles. Not fixing potholes can cause damage to vehicles and rack up costly repairs.
water damage is a leading cause of asphalt damage and potholes.
To prevent potholes, ensure proper drainage to prevent water pooling and fill any cracks as soon as possible. If potholes do form, repair them immediately before they become safety hazards.
How to patch a driveway pothole
The steps below should be followed to repair a pothole in your driveway:
- Take out the trash: Get rid of any loose gravel, dirt, or stones from the area around the pothole and the surrounding ground.
- Identify the pothole’s depth: To gauge the pothole’s depth, use a level or straightedge.
- Fill the divot: Fill the pothole with patching material, such as asphalt patching compound.
- Compact the patching material: Use a tamper or other tool to compact the patching compound and make sure it is level with the surrounding area.
- Apply a sealcoat: Seal the driveway to protect the patching compound and prevent future damage.
- Give it time to cure: Depending on the product you used, the manufacturer’s instructions for curing time may differ.
- Driveway resurfacing: To get a smooth, even driveway, you may need to resurface it.
Looking for a professional asphalt contractor to take care of your asphalt surfaces?
Look no further than Nathan’s Paving! Our experienced team is equipped to handle any asphalt driveway issues you may be facing, from cracks and potholes to complete resurfacing.
We guarantee fair pricing and high-quality work.
Don’t wait any longer to fix those pesky asphalt issues – contact Nathan’s Paving today and let us take care of it for you!
Problem #3: Fading
Fading is caused by exposure to sunlight and other elements and can make your driveway look less attractive over time.
How to prevent your driveway from fading
- Maintain it: Cleaning your driveway on a regular basis can help stop the accumulation of dirt and grime that can cause fading.
- Avoid using harsh chemicals: Harsh chemicals, such as bleach or ammonia, can damage the surface of your driveway and contribute to fading. Use mild detergents and cleaners instead.
Problem #4: Rutting
Rutting occurs when heavy vehicle traffic or poor installation causes depressions in the asphalt surface.
To address rutting issues ensure proper grading and compaction during installation or consider adding additional layers of fresh asphalt if required.
How to address rutting
- Debris removal: Remove any loose stones, dirt, or gravel from the surface of the driveway.
- Determine the depth and extent of the rutting: Use a level or straightedge to measure the depth of the ruts and to determine how far they extend.
- Fill the ruts: Use a patching compound, such as asphalt patching compound, to fill the ruts. Follow the manufacturer’s instructions for mixing and applying the product.
- Smooth the surface: Use a trowel or other tool to smooth the surface of the patching compound and make sure it is level with the surrounding area.
- Allow time to cure: Follow the manufacturer’s instructions for the curing process, which may vary depending on the product you used.
- Consider resurfacing the driveway: If the rutting is severe or widespread, it may be necessary to resurface the driveway to create a smooth, even surface.
- Improve drainage: Address any drainage issues that may be contributing to the rutting, such as installing a drainage system or grading the driveway to slope away from your home.
Problem #5: Bleeding
Bleeding is caused by excess asphalt binder in the mix rising to the surface of the pavement creating slick surfaces that can damage vehicles. To address bleeding issues apply sand or other absorbent materials to the surface as needed.
How to fix
- Wait for cooler weather: The bleeding may stop on its own as the weather cools down.
- Debris removal: Remove any loose debris, dirt, or gravel from the surface of the driveway.
- Apply sand: Sprinkle a layer of sand on the surface of the driveway to absorb the oils and prevent them from bleeding.
- Wait for the sand to absorb the oils: Leave the sand in place for several days to allow it to absorb the oils.
- Remove the sand: Use a broom or leaf blower to remove the sand from the surface of the driveway.
- Apply a seal coat: Apply a seal coat to the surface of the driveway to prevent future bleeding and to protect the surface from damage.
Remember, prevention is key to avoiding bleeding driveways. Ensure that your driveway is properly installed and do regular maintenance.
Try to avoid parking heavy trucks or equipment on the surface for extended periods of time during the hot summer months.
Problem #6: Low spots
Low spots can form due to improper grading or compaction during the asphalt driveway installation process resulting in poor drainage and increased wear on tires. To fix low spots yourself, you’ll need some basic tools or hire a professional to help with drainage installation.
How to fix low spots in your driveway
Fixing low spots in your driveway will depend on the size and severity of the uneven surfaces. Here are some steps you can take to fix depressions in Asphalts in your driveway:
- Clean the area: Before beginning any asphalt driveway repairs, make sure to clean the area of any loose gravel, dirt, or loose asphalt.
- Fill the low spot: If the depression is shallow, you can fill it with a cold patch asphalt mix. Pour the mix into the depression and spread it evenly with a shovel or rake. Make sure to compact the mix with a tamper or your foot to ensure it is level with the rest of the driveway.
- Add more layers: For deeper depressions, you may need to add more layers of the cold patch mix. Apply the first layer, let it dry, and then add more layers until the depression is filled.
- Use a hot mix asphalt: If the depression is too large or severe for a cold patch mix, you may need to use hot asphalt. This process involves heating the asphalt and then pouring it into the depression. This should be done by a professional.
- Sealcoat: Once the asphalt repairs are complete, you should apply asphalt sealer to the entire driveway to protect it from further damage.
It is important to note that repairing low spots in your driveway is a temporary solution. Over time, your driveway may develop more depressions, and it may be necessary to repave the entire driveway. contact a paving professional for more help.
Nathan’s Paving offers professional asphalt paving services that are second to none. With our team of experienced and skilled professionals, you can expect nothing but the highest quality asphalt paving for your project.
Whether you need a new driveway, parking lot, or any other asphalt paving project, we’ve got you covered. Trust us to deliver high-quality asphalt paving that will stand the test of time.
Problem #7: Oil Stains
Oil stains on your driveway can be unsightly and difficult to remove. Here are some steps you can take to clean oil stains from your driveway:
- Absorb the excess oil: Use a clean cloth or paper towels to absorb as much of the excess oil as possible.
- Use a degreaser: Use a commercial degreaser to clean up the stain.
Follow the instructions from the degreaser’s maker for how to apply it and how long to let it sit. - Scrub the area: Use a stiff-bristled brush to scrub the stained area. Scrub in a circular motion to lift the oil from the surface. You may need to apply more degreaser and scrub a few times to completely remove the stain.
- Rinse the area: Use a hose or pressure washer to rinse the area thoroughly. Make sure all the degreaser and oil residue are removed.
- Repeat if necessary: If the stain is still visible, repeat the process until the stain is removed.
- Prevent future stains: To prevent future oil stains, consider placing a drip pan under your vehicle to catch any oil leaks. You can also sealcoat your driveway to help repel oil and other stains.
Note: Be sure to properly dispose of any oil or degreaser that you use, as they can be harmful to the environment.
Conclusion
proper maintenance is crucial for ensuring the longevity of your new asphalt driveway – if you notice any of these issues with your own driveway then take appropriate action before it’s too late!
From using hot asphalt to sealcoating, there are many steps you can take to keep your driveway looking great for years to come.
Have questions about your asphalt driveway?
Looking for an asphalt professional who goes the extra mile to ensure your asphalt maintenance needs are met at an affordable price?
Look no further than Nathan’s Paving!
Our team of experienced professionals is equipped to handle any potential issues that may arise with your asphalt surfaces, and we always strive to keep additional costs to a minimum.
Plus, we’re happy to provide a free estimate so you can see for yourself just how affordable our services can be.
Don’t wait any longer to give your asphalt the attention it deserves – contact Nathan’s Paving today!